In this article for quilters, I’m touching upon printing out my patterns correctly, selecting fabrics, cutting and sewing techniques, making decorative stitching, and painting character details with textile paints.
Table of contents:
Printing out a pattern
Selecting Fabrics
Cutting and Sewing
Making Decorative
Stitching
Painting Details
Printing out a pattern
Be sure to choose “actual size” or “100%” in the printer’s settings. I recommend using a color printer.
Selecting Fabrics
Many of the blocks are low-volume (low-contrast) patchwork, so the block instructions do not include materials lists. Look at the patterns and finished blocks and try to find everything you need in your collection of fantastic fabric scraps.
Cutting and Sewing
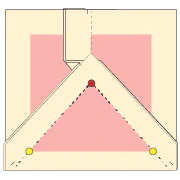
To make a block, cut out all the pattern pieces and then sew the pieces together following the steps shown in the diagram. The numbers on the diagram indicate the correct order in which to sew the pieces.
Cutting with seam allowances:
Always cut and sew with a 1/4” seam allowance, keeping in mind that the templates do not include the seam allowance.
Sewing:
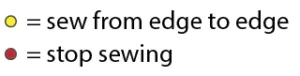
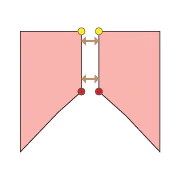
Sew the pieces together from edge to edge, unless otherwise noted, and backstitch at both the beginning and end of each seam (if hand-sewing, make knots).
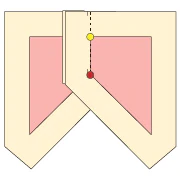
The yellow and red dots indicate when to start and stop sewing, respectively, at the seam allowance, rather than sewing from edge to edge.
This technique is used to set pieces into each other.
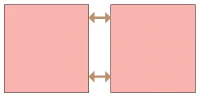
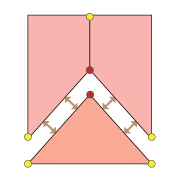
Sew from edge to edge and press the seam allowance:
Example 1
Pieces before sewing, as shown in the project steps.
After sewing from edge to edge.
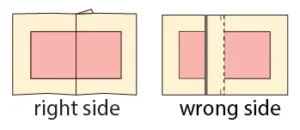
Example 2
Pieces before sewing, as shown in the project steps
After sewing (wrong side shown)
Example 3
Pieces before sewing, as shown in the project steps
After sewing (wrong side shown) Stop sewing at the red dot and press the seam allowance.
Remember, the seam allowance is not pictured in the project steps.
Making Decorative Stitching
Backstitching
A dotted line on a colored pattern (shown with each project) indicates backstitching for blocks’ decorative details, such as lips or a spider web.
Draw the details on an already sewn block with a water-soluble marker (or chalk) and backstitch using heavyweight thread or floss.
Remove any visible markings with water and a cotton swab.
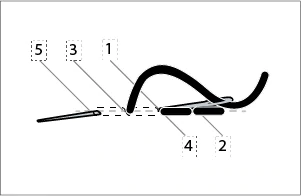
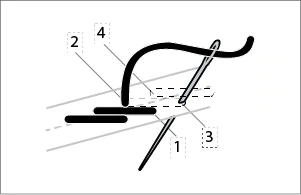
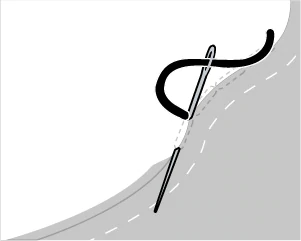
Outline Stitching
A bold line on a template indicates the outline stitch. This is a flexible stitch that can follow gentle curves. Please pay careful attention to the following stitching instructions to make perfect lines. Note that all stitch points in the outline stitch will fall on the stitch line.
Draw the details on an already sewn block with a water-soluble marker (or chalk) and backstitch using heavyweight thread or floss. Remove any visible markings with water and a cotton swab. I worked this stitch from left to right.
These instructions are for right-handed quilters.
Bring out the thread through (1) and take it in through (2). Take the needle backward and bring the thread out through (3). Make sure the point (3) lies under the stitch (1–2). (Note that the point (3) lies about halfway through (1) and (2).)
Take the needle in through (4). Try to mark (4) in such a way that the point (2) will lie halfway through (3–4). Bring the needle out through (2). The stitch point (2) will be at the bottom of the previous stitch.
Continue this pattern of stitching with the needle always coming out from the bottom of the previous stitch.
The reverse of the fabric will give you a backstitch pattern.
Painting Details
Use textile paint to add details such as eyes and small dots and dashes. Textile paint is especially important if you want your project to be washable. For most of my blocks, I used white and either black or dark brown paint.
First, mark the details (eyes, mouth, dots) with a fine-tipped water-soluble marker or ballpoint pen and then paint over your pen marks. For eyes and dots, I recommend using an embossing tool (1.2mm or 1.8mm) or the head of a small pin to apply paint.